放暑假了 有时间了 就买了些东西做光立方

做死的8*8*8 哈哈
由于有手机了 所以 就拍了 很多图片 下面跟大家分享下制作过程
需要的东西有 ,上好的单片机,18*30cm的洞洞板 (或者更大)8550三极管 3k的电阻一堆 200欧姆的0805贴片电阻 八个74hc573 锁存器芯片。 和对应的芯片座两个 74hc595移位寄存器芯片 焊锡 ok线(就是图片中蓝色的一卷线,可有可无) 一包 600个led 六角铜柱 螺丝 螺母 排针排座啥的 以及其他的一些零碎东西


首先捏 把这个巨大的洞洞板切割开 像这样 一个正方形 一个长方形
最好沿着边切 切完后把板子边缘打磨圆滑

为了好看我把它们 用喷漆喷成了白色


弄完这个以后 就去焊接灯泡了 我的设计是层共阳
所以横的这个引脚是正极


然后捏 用木头做个模子 打上孔 我的led的间距是七个洞洞
所以 就比着打孔 达成三毫米的

把灯泡塞在上面 焊接好

就这样 一溜一溜的焊接。。。 弄完之后
再用洞洞板做个小模板

把一溜一溜的 灯条 塞上去 焊接 就是这样


最后 拼接成这样

然后奋战好几天最后弄出了 八片!!!1

弄完八片后 洞洞板也干了
在正方形的板子上 把准备插入的洞洞 用记号笔表记起来
在剪一些8p的排针 弄成这样 插到洞洞板里


焊接好 弄成这样是为了跟下面的一层板连接
另一块板子 就都是芯片 专门的控制板


在另一块板子上对应的地方插上排座 并焊接好

然后两块板子都打上3mm的孔 用来固定

像这样

然后 焊接那块正方形的板子 就是用线把排针和对应的孔旁边的
焊盘连接起来,这时候ok线就派上用场了 ok线的皮很好抠,一抠
就抠下来一大段

像我这样 抠下来一大段裸铜线后 在板子上连接

如果碰到 要跳线的地方 就再从线上扣下来一段皮 滑到需要跳线的地方
就可以了


最后把整个 板子弄完

这块板子弄完了 就弄另外一块控制板
我的是这样的布局 你们也可以随便弄 怎么方便怎么来

左下角的那排坐 是接到光立方的每一层的

弄完后 就焊接限流电阻 每一个led都要限流 所以就是六十四个

一个一个的焊接到排座上 最后跟573的芯片座连接起来


然后在焊接层驱动 本来准备用2803的 结果发现它不能输出电流 只能 倒灌电流 感觉很不爽!! 于是就用三极管驱动 虽然不知道
别人怎么用 2803的。。。。。 不过三极管最简单
我用的是8550pnp三极管 低电压导通 由于我老爹前几天买回来好几斤电阻 有很多3k的 所以我就用他了 当然 你们也可以用其他阻值的电阻


这里正好空着地方 于是乎

由于 焊接光立方 和给第一张板子布线 焊锡 快用完了
最后 用的ok线 完成了 整块板子的布线

这个地方 弄得不太好 自己觉得很难看

然后把总线也弄上

最后完成

然后把 一片片的点阵 弄到正方形板子上


接果 焊锡正好不够了。。。。。。。
悲催!!! 层没法焊了。
无奈第二天 买了一大卷
足足大了一倍 30块。。。。


最后弄完了 就组合起来

或者事先焊上音频接口 和迷你usb 开关
再往中断上接个开关 啥的。。


最后 拧上螺母螺丝 拼接起来

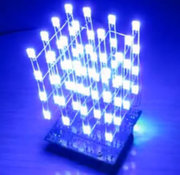
下面是效果图 由于时间原因 程序很简陋。。
只有595 573的驱动显示程序 暂时弄个全亮的图给大家了

最后也把资料奉献给大家 里面的工程师proteus文件 和程序
 888光立方项目.rar 888光立方项目.rar
等过几天我把更多的功能写出来 包括音频显示 啥的 到时
候给大家放视频!!
@大狗熊 @爆燃·火星 @无语·兄 @看门查水表 @游泳的鸟儿 @寒冰·兄 @zjk995063909


-
-
51单片机开发学习板4*4*4彩色led光立方DIY电子制作套件散件散套
(责任编辑:admin) |